
Marled Triangle Scarf Free Pattern
- esterpuente
- Dec 15, 2025
- 3 min read
Updated: May 30

Scrap Yarn Projects
Every year I look forward to gathering up all my leftover yarns from various projects and sorting them into color schemes that I can turn into scarves and shawls. It's my favorite way to get a unique piece that is beautiful and reduces my yarn stash! The Marled Triangle Scarf is the first of my go-to scrap yarn projects that I wanted to share with you all.
Here's how I make mine:
Yarn: Assorted fingering/sock weight yarns. Total yardage will depend on how long you want your scarf or shawl. You will be holding the yarns double so the yardage needed will be approximately around 1000-1200 yards. Thats about the equivalent of 2.5 - 3 skeins of fingering weight yarn total. You can use a kitchen scale to weigh your scraps and 6.5 - 7.0 oz or at 180 grams should get you a nice scarf with the finished dimensions of 27 inches from bottom tip to top, and 72 inches long. Garter stitch stretches out as it is worn so the scarf will naturally grow slightly larger.


Needles: Size US 10.5 or 6.5mm needles. I use circular needles to accomodate the number of stitches.
Instructions:
Set Up Rows:
Cast on 3 stitches using your preferred cast on method. I use long-tail cast on.
Knit the next row.
Body Repeats:
Row 1: Knit 1, knit into the front and back of the next stitch, knit to the end of the row.
Row 2: Knit row.
Repeat these two rows, holding your yarn double and adding in new colors as you desire. Use smaller leftovers first to give them the most colorplay. Save your larger sized balls for later when the rows will be much longer and you'll need more yardage to achieve a bigger color block. You can add colors in randomly, create a stripe pattern or ombre effect or let fate decide by grabbing the next color in your stash.
Finishing: When you have reached your desired length or when you are nearing the end of your stash, bind off loosely as follows: *Knit two stitches together through the back loop, pass the stitch back to the left hand needle, repeat from * to the end of the row. Give a gentle tug on your bind off edge every few stitches to stretch them gently and make sure your tension is even. If you want to be sure that your bind off will be loose I suggest using a larger needle size in your right hand.
Watch my video on YouTube for helpful tips and instructions. See how I fold my scarf for wearing and different options you can choose from.
Thank you for visiting my website and I hope you get a chance to knit a one-of-a-kind scarf for yourself or someone you love. Be sure to subscribe to my email list so you can hear about new patterns, knitting stitch video tutorials, and handmade gifts from Industrial Whimsy. Sign up here: http://eepurl.com/gfoLN1
You can find my Ravelry designer portfolio here: https://www.ravelry.com/designers/ester-puente
YouTube channel stitch tutorials: https://youtube.com/@industrialwhimsytv?si=qeKf0VW8dWYzfP8Y


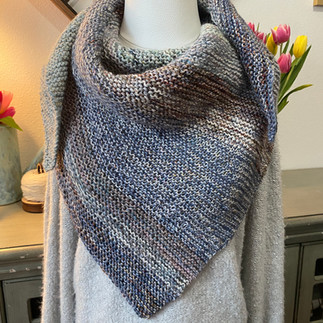
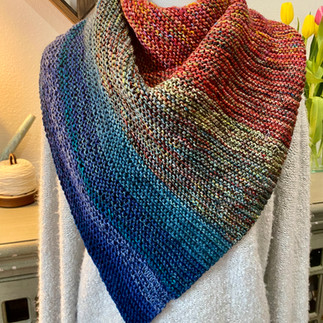
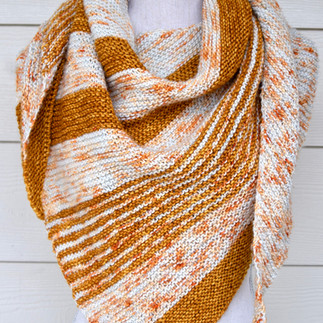
**UPDATE 1/21/2026** I've made three more of these marled triangle scarves now and I am loving how much yarn I have moved out of my leftovers bucket. I am casting on another scarf in neutrals right now but here are the ones I have completed so far. I did all my blue yarns, all my pastel yarns (this one reminds me of a watercolor painting) and all my darker jeweled toned yarns. This one ended up as sort of a rainbow in color as I kept all the color families together and transitioned between them with variegated yarns.
You can see more pictures and details of them on my Ravelry Page. The finished pieces are also for sale here in the Hand Knits section. Each is one of a kind and completely unique.


If you love garter stitch you might like my Garter Graffiti Shawl. It’s a fun project that lets you use those great hand dyed skeins of yarn that are so irresistible. The pattern comes with two variations so you can create several shawls.


I really enjoyed reading your post on the marled triangle scarf free pattern It was interesting how you explained the technique of combining two different yarn colors together to create that subtle marled effect I have tried a few simple scarves before but never experimented with marled yarn so this gave me some new ideas I also liked how you included tips on keeping the edges neat and even while working the increases It reminded me of a project I saw recently where someone shared their knitting progress on a forum and it got me thinking about how different patterns can be adapted I was reading with Online Assignment Help in Australia open on my laptop and it made me…